
The Magic of Adhesive Dots: Clean, Convenient, and Versatile Bonding
Explore the world of adhesive dots, where precision and ease of use meet to simplify bonding and fastening. Discover how these versatile adhesive discs offer clean and efficient solutions for various applications, from crafts to packaging and beyond.
The Magic of Adhesive Dots in Bonding and Fastening
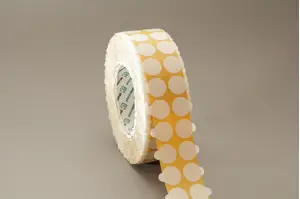
An adhesive dot, also known as a glue dot, is a small, round adhesive disc or spot of glue used for various bonding and fastening applications. These adhesive dots are typically pressure-sensitive, which means they adhere when pressure is applied, and they can be used for temporary or permanent bonding of materials. Adhesive dots are often used in crafts, packaging, and assembly processes for their ease of use and clean application. They come in various sizes and adhesive strengths to suit different needs.
What are adhesive dots used for?
Adhesive dots, also known as glue dots, are versatile and find a range of uses in various industries and applications. Some common uses of adhesive dots include:
- Crafts and Scrapbooking: Adhesive dots are popular for attaching photos, embellishments, and paper elements in scrapbooking projects. They provide a clean and non-messy way to secure items.
- Packaging: In the packaging industry, adhesive dots are used to attach promotional materials, coupons, or samples to product packaging. They can also be used to seal packages or affix labels.
- Paper Products: Adhesive dots are used in the production of envelopes, cards, and other paper products to bond various components together.
- Point of Sale Displays: Adhesive dots secure promotional materials, price tags, or product samples to point of sale displays and retail fixtures.
- Direct Mail: In direct mail marketing, glue dots are employed to affix items like samples, cards, or brochures to promotional mailers.
- Product Assembly: Adhesive dots are used in manufacturing and assembly processes to bond components temporarily or permanently, especially in industries like electronics, automotive, and medical devices.
- Floral Arrangements: In floristry, adhesive dots are used to attach bows, decorative elements, or cards to floral arrangements and gifts.
- Home Decor: For DIY home decor projects, adhesive dots can secure wall art, mirrors, and other decorations without damaging surfaces.
- Temporary Signage: Adhesive dots can be used to mount temporary signs, posters, or banners for events, promotions, or exhibitions.
- Temporary Fastening: Adhesive dots can be used for temporary fastening of lightweight items such as name badges, posters, or decorations at events or in offices.
- Photography: In photography, adhesive dots are used to attach backdrops, props, or reflective materials to create the desired background and lighting effects.
- Gift Wrapping: Adhesive dots can be used in gift wrapping to secure ribbons, bows, and other decorative elements to gifts and packages.

How do you use dotting adhesive?
Using dotting adhesive, also known as glue dots, is a straightforward process that involves applying small, round adhesive dots to various surfaces for bonding or attachment purposes. Here's how to use dotting adhesive effectively:
Materials You'll Need:
- Dotting adhesive (glue dots)
- The item or material you want to attach
- A clean and dry surface
Steps:
- Preparation:
- Ensure that both the surface where you want to attach the item and the item itself are clean and free of dust, dirt, and moisture. Cleaning the surfaces beforehand ensures a better bond.
- Select the Right Adhesive Dot:
- Choose the appropriate type of dotting adhesive based on your application. Some dots are designed for temporary bonding, while others offer a more permanent hold. Ensure that the adhesive strength matches your needs.
- Peel the Dotting Adhesive:
- Remove a dot from the adhesive roll or sheet. Most dotting adhesives come with a protective backing that you can peel off to expose the adhesive side.
- Apply the Dot:
- Carefully place the adhesive dot on the item you want to attach. Ensure that the adhesive side of the dot is in contact with the item's surface.
- Press Firmly:
- Apply gentle pressure to the dot to ensure a strong bond. This helps activate the adhesive and securely attaches the dot to the item.
- Position the Item:
- Carefully position the item with the attached dot onto the desired surface. Apply firm, even pressure to ensure a good bond between the item and the surface.
- Secure the Bond:
- Allow the adhesive dot to set and bond the item to the surface. The time needed for the dot to fully set can vary depending on the type of adhesive and environmental conditions. Follow the manufacturer's recommendations for the specific dotting adhesive you are using.
- Testing and Quality Control:
- After allowing the bond to set, test the attachment to ensure it is secure. Gently pull or press on the attached item to check for any signs of detachment. If the bond is not secure, you may need to reapply the adhesive dot or consider using a stronger adhesive.

Are Glue Dots and adhesive dots the same thing?
Yes, "Glue Dots" and "adhesive dots" generally refer to the same type of product. These terms are often used interchangeably to describe small, round adhesive discs or dots that are used for various bonding, fastening, and adhesive applications. Glue dots, or adhesive dots, are typically double-sided adhesives that come in the form of small, pre-cut circles or dots on a roll or sheet. They are designed for clean and convenient attachment of items to surfaces and are widely used in crafting, packaging, and assembly processes. Whether referred to as Glue Dots or adhesive dots, they serve the same purpose of providing a mess-free and efficient bonding solution.
What are adhesive dots made of?
Adhesive dots, also known as Glue Dots or adhesive discs, are typically made from a combination of materials that include the adhesive itself and a backing material. The specific composition can vary depending on the manufacturer and the intended use of the adhesive dots, but here are the general components:
- Adhesive: The adhesive is the key component of adhesive dots, and its composition can vary. Common adhesive types used in adhesive dots include acrylic adhesives, rubber-based adhesives, and hot melt adhesives. The choice of adhesive can affect the dot's strength, tackiness, and other properties.
- Backing Material: Adhesive dots are usually provided on a backing material, such as a paper or film liner, that protects the adhesive until it's ready for use. The backing material provides stability and facilitates easy handling and application.
- Release Liner: Some adhesive dots may have a release liner, which is a non-stick layer that covers the adhesive side of the dot. It prevents the dots from sticking to each other or other surfaces before use. Users typically remove the release liner to expose the adhesive side.

Are Glue Dots safe for skin?
Glue dots, also known as dotting adhesive or adhesive dots, are generally not intended for use on the skin. They are primarily designed for adhering items to surfaces or for various craft and bonding applications. Glue dots can be too strong for delicate or sensitive skin, and the adhesive may not be skin-friendly.
If you need to adhere something to your skin temporarily, it's advisable to use specialized skin-safe adhesives designed for this purpose, such as medical or cosmetic adhesives. Always follow the manufacturer's instructions and safety guidelines when using any adhesive on the skin to prevent irritation or other adverse reactions.
It's essential to be cautious when using adhesives on the skin, especially for extended periods, as skin sensitivity varies from person to person. If you experience any skin irritation, redness, or discomfort, remove the adhesive immediately and seek medical advice if necessary.
How strong are Glue Dots?
The strength of Glue Dots can vary depending on the specific product and adhesive formula. Glue Dots are available in various adhesive strengths, and the manufacturer typically labels the products to indicate their bonding capabilities. Some common strength options for Glue Dots include:
- Removable or Temporary: Glue Dots designed for temporary bonding are often easy to remove without leaving residue or damaging surfaces. They offer a lower level of adhesion and are suitable for applications where items need to be attached temporarily.
- Low Tack: Glue Dots with low tack provide a moderate level of adhesion. They are suitable for semi-permanent bonding needs and can be removed with minimal effort.
- Medium Tack: Medium-tack Glue Dots offer a stronger bond and are suitable for applications where a more secure attachment is required. They can be used for both temporary and semi-permanent bonding.
- High Tack: Glue Dots with high tack offer a strong and long-lasting bond. They are ideal for applications where a more permanent attachment is necessary.
- Permanent: Some Glue Dots are designed for permanent bonding, offering the highest level of adhesion and durability. These are intended for applications where items should not be removed.

How do you remove Glue Dots from walls without removing paint?
To remove Glue Dots from walls without damaging the paint, you can follow these steps:
Materials You'll Need:
- Hairdryer
- A plastic card (such as a credit card or ID card)
- Mild dish soap
- A clean cloth or sponge
- Warm water
Steps:
- Heat the Glue Dots:
- Use a hairdryer on a low heat setting to gently warm the Glue Dots on the wall. Hold the hairdryer a few inches away from the Glue Dots and move it back and forth. This helps soften the adhesive and makes it easier to remove.
- Peel Off Gently:
- Once the Glue Dots have been heated, use a plastic card to gently lift the edges of the Glue Dots. Start from one corner and carefully peel them off. Avoid using sharp objects that could damage the paint.
- Remove Residue:
- If there is any adhesive residue left on the wall, you can clean it with a solution of mild dish soap and warm water. Dampen a clean cloth or sponge with the soapy water and gently rub the residue until it comes off.
- Rinse and Dry:
- After removing the residue, rinse the wall with clean water to remove any soap residue. Then, pat the area dry with a clean, dry cloth.
- Inspect and Touch Up:
- Examine the wall to ensure that all traces of the Glue Dots and residue are gone. If there are any minor blemishes or color differences in the paint, you may need to touch up the area with matching paint to restore the wall's appearance.

What is the best adhesive remover for concrete?
The choice of the best adhesive remover for concrete depends on the type of adhesive and the condition of the concrete surface. Here are some effective adhesive removers commonly used for concrete:
- Acetone: Acetone is a strong solvent that can effectively remove adhesives, including glue, tape residue, and some types of adhesive labels, from concrete surfaces. It evaporates quickly, leaving little residue.
- Mineral Spirits: Mineral spirits, also known as white spirits, are effective at removing many adhesives from concrete. They are less harsh than acetone and can be a good option for less stubborn adhesives.
- WD-40: WD-40 is a versatile product that can help loosen and remove adhesive residues from concrete. Apply it to the adhesive, let it sit for a few minutes, and then wipe or scrape off the residue.
- Goo Gone: Goo Gone is a commercial adhesive remover that is often effective on a variety of adhesive types. It is available in both liquid and gel forms and can be used on concrete surfaces.
- Adhesive Remover Products: There are many adhesive remover products available in hardware stores and online that are specifically formulated for removing adhesives from various surfaces, including concrete. These products are often effective and easy to use.
When using adhesive removers on concrete, it's essential to follow these general guidelines:
- Always test the adhesive remover on a small, inconspicuous area of the concrete first to ensure it doesn't damage or discolor the surface.
- Follow the manufacturer's instructions for the specific adhesive remover product you are using.
- Ventilate the area well when working with solvent-based removers.
- Use gloves and eye protection when handling adhesive removers.
- Ensure that the area is free from any open flames or sparks when using solvent-based removers, as they can be flammable.
Adhesive dots, also known as Glue Dots, are small, round adhesive discs designed for clean and convenient bonding and fastening applications. Comprising an adhesive layer and a backing material, they offer various adhesive strengths and are commonly used in crafts, packaging, and assembly processes. Adhesive dots provide a mess-free and efficient solution for attaching items to surfaces and are available in different formulations to suit different needs. Their versatility and ease of use make them a popular choice for temporary and semi-permanent bonding requirements.


