
Revolutionize Your Painting Projects with the Right Roller Tray
A roller tray is a shallow, flat container with raised edges used in painting projects. It holds paint and allows for easy loading of paint rollers, ensuring even application on surfaces. It often features grids or ridges to distribute paint and minimize excess. After use, it should be promptly cleaned for longevity and effectiveness in future projects. Proper maintenance includes regular checks for damage and appropriate storage to prevent warping or degradation. Choosing the right type and material ensures optimal performance in various painting tasks.
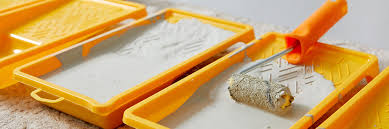
Types and Features of Roller Trays for Effortless Painting

Painting can be a transformative experience, turning dull walls into vibrant statements. One of the unsung heroes in this process is the humble roller tray. Often overlooked, a roller tray plays a crucial role in ensuring a smooth, efficient, and mess-free painting project.
Roller trays come in various types, each designed to cater to specific painting needs.
- Standard Plastic Trays:
- Description: These are the most widely used and readily available roller trays. They are typically made of durable, lightweight plastic.
- Advantages: Affordable, easy to clean, and suitable for most interior and exterior painting projects.
- Best For: Standard household painting tasks, especially when using water-based paints.
- Metal Trays:
- Description: Metal trays are constructed from materials like steel or aluminum, providing sturdiness and durability.
- Advantages: Resistant to solvents, making them perfect for use with oil-based paints. They are also long-lasting and can withstand heavy use.
- Best For: Heavy-duty applications and commercial projects.
- Disposable Trays:
- Description: These trays are typically made of lightweight, disposable materials like plastic or cardboard.
- Advantages: Convenient for one-time or short-term projects, reducing the need for clean-up. They're also very cost-effective.
- Best For: Quick touch-ups or small-scale projects where reuse is not a priority.
- Multi-Compartment Trays:
- Description: These trays come with multiple compartments or reservoirs for holding different paint colors or types.
- Advantages: Ideal for projects that require frequent color changes without the hassle of pouring and cleaning trays between changes.
- Best For: Artistic or decorative painting tasks, faux finishes, or projects with intricate details.
- Roller Grids and Inserts:
- Description: While not exactly a tray, roller grids are a popular alternative. They are flat, gridded surfaces that can be placed inside a paint bucket or on top of a paint can.
- Advantages: They help distribute paint evenly on the roller cover, preventing overloading and reducing mess.
- Best For: Painting directly from a bucket or can, which is common in professional settings.
- Deep Well Trays:
- Description: These trays have higher walls or deeper reservoirs compared to standard trays, allowing for larger quantities of paint to be held.
- Advantages: Particularly useful for larger projects as they reduce the frequency of refilling the tray.
- Best For: Painting large surface areas or walls where a significant amount of paint is required.
- Magnetic Tray Liners:
- Description: These are specialized liners designed to fit inside metal roller trays.
- Advantages: They have embedded magnets that secure the roller frame in place, preventing accidental spills or slipping.
- Best For: Use with metal trays for added stability, especially when working at heights or in tight spaces.
- Customizable Tray Systems:
- Description: These trays come with adjustable features such as removable grids, dividers, or attachments to accommodate various paint tools and accessories.
- Advantages: Highly versatile, allowing for customization based on the specific needs of a project.
- Best For: Advanced or specialized painting tasks that require a range of tools and techniques.
The material and build quality of a roller tray are critical factors that influence its durability, stability, and overall performance.
1. Material:
a. Plastic:
- Description: Plastic roller trays are typically made from high-density polyethylene (HDPE) or other durable plastics. They are lightweight, easy to handle, and resistant to most chemicals found in paints.
- Advantages: Affordable, easy to clean, and resistant to rust or corrosion. They are suitable for both water-based and oil-based paints.
- Considerations: Look for trays made from high-quality plastics to ensure longevity.
b. Metal:
- Description: Metal roller trays are typically constructed from materials like steel or aluminum. They are sturdy and resistant to damage from solvents commonly found in oil-based paints.
- Advantages: Highly durable and capable of withstanding heavy use. They are also less likely to warp or degrade over time.
- Considerations: Choose trays with rust-resistant coatings or materials for extended lifespan, especially if you plan to use them with oil-based paints.
c. Disposable or Cardboard:
- Description: Disposable roller trays are usually made from lightweight materials like plastic or cardboard.
- Advantages: Cost-effective and convenient for one-time or short-term use. They reduce the need for clean-up after a project.
- Considerations: While not as durable as plastic or metal trays, they serve well for quick touch-ups or small-scale projects.
2. Build Quality:
a. Thickness and Sturdiness:
- Regardless of the material, a roller tray should have a solid, well-constructed feel. Thicker plastics and reinforced metal edges indicate higher build quality.
b. Seamlessness and Reinforcements:
- In plastic trays, look for seamless designs without weak points or seams that might be prone to cracking or breaking. Metal trays should have reinforced edges to prevent bending or warping.
c. Welded Joints (for Metal Trays):
- If you opt for a metal tray, check for sturdy welds at the joints. These ensure the tray maintains its shape under the weight of paint and roller.
d. Anti-Skid Features:
- Some trays have anti-skid features like rubberized bottoms or textured surfaces to prevent slipping or sliding during use.
e. Compatibility with Rollers:
- The tray should be designed to securely hold the roller, preventing it from wobbling or falling off during painting.
f. Resistant Coatings (for Metal Trays):
- If choosing a metal tray, consider whether it has protective coatings to resist corrosion or damage from chemicals found in certain types of paints.
A roller tray is a flat, shallow container with raised edges that is designed specifically for holding paint during a painting project. It is an essential tool used in conjunction with a paint roller for applying paint evenly and efficiently to surfaces.
- Paint Dispensation: The main purpose of a roller tray is to hold a certain quantity of paint that is easily accessible to the paint roller. It provides a flat surface for pouring or loading paint.
- Even Paint Distribution: The roller tray is designed with ridges, grooves, or grids at the bottom. These features help distribute the paint evenly across the roller, ensuring that it is loaded uniformly.
- Minimizing Excess Paint: The design of the tray, particularly the ridges or grids, helps remove excess paint from the roller. This prevents drips or uneven application, leading to a smoother finish.
- Convenience and Accessibility: A roller tray keeps the paint within easy reach of the painter. This reduces the need for constant trips to a paint can or bucket, improving workflow and efficiency.
- Mixing and Blending Colors: For projects that require multiple colors or blends, a roller tray with multiple compartments can be used. This allows for easy access to different paint colors without the need for separate containers.
- Control and Precision: A roller tray provides a controlled environment for loading paint onto the roller, allowing the painter to have precise control over the amount of paint applied to the surface.
- Reducing Spills and Splatters: The raised edges of the tray help contain the paint, reducing the likelihood of spills and splatters on floors or other surfaces.
- Quick Cleanup: Roller trays are designed to be easy to clean after use. They can be wiped down or washed, making cleanup faster and more efficient.
- Versatility of Use: Roller trays can be used for various types of paint, including water-based and oil-based paints. This makes them a versatile tool suitable for a wide range of projects.
- Professional Finish: By utilizing a roller tray, painters can achieve a more professional finish compared to using a brush alone. The even distribution of paint results in a smoother, more uniform coat.
When selecting a roller tray for your painting project, there are several key features to consider. These features can enhance functionality and make the painting process more efficient.
- Grids or Ridges:
- Look for a roller tray with grids or ridges at the bottom. These features help evenly distribute paint on the roller, preventing overloading and ensuring a consistent application.
- Magnetic Brush Holder:
- Some roller trays come equipped with a magnetic strip or holder for securing paintbrushes. This keeps your brushes within easy reach, eliminating the need to set them down or find a separate holder.
- Pour Spout:
- A pour spout allows for easy and controlled pouring of excess paint back into the paint can or bucket. This minimizes waste and mess.
- Adjustable Frame Holder:
- Some roller trays have adjustable holders or brackets for securing the roller frame. This feature ensures a secure fit for different roller sizes and types.
- Non-Slip Base:
- Look for a roller tray with a non-slip base or rubberized feet. This helps stabilize the tray and prevents it from sliding or moving around while you work.
- Deep Well Design:
- For larger projects or when using a roller with a longer nap, consider a roller tray with a deep well design. This allows for a greater paint capacity and reduces the need for frequent refilling.
- Multi-Compartment Trays:
- If you anticipate using multiple paint colors or types during your project, consider a roller tray with multiple compartments. This feature keeps different paints separated and easily accessible.
- Durable Construction:
- Look for a roller tray made from sturdy and durable materials. High-quality plastics or rust-resistant metals are good options. A well-constructed tray is less likely to warp or break during use.
- Easy-to-Clean Design:
- A roller tray should be easy to clean after use. Smooth, seamless surfaces without hidden crevices or hard-to-reach areas make cleaning a breeze.
- Compatibility with Extensions or Poles:
- If you plan to use a roller extension or pole, ensure that the roller tray is designed to accommodate these accessories. Look for features like slots or attachments for secure connection.
- Stackability or Nesting:
- If you need to store multiple roller trays, consider trays that are designed to stack or nest together. This saves space and keeps your workspace organized.
- Environmental Considerations:
- For environmentally-conscious painters, look for roller trays made from eco-friendly materials or those with recyclable options.
Cleaning:
- Immediate Post-Use Cleaning:
- After you finish painting, it's best to clean the roller tray right away, while the paint is still wet. This prevents the paint from drying and becoming more difficult to remove.
- Scrape Excess Paint:
- Use a putty knife or a similar tool to scrape off any excess paint from the tray. This will make the cleaning process easier.
- Use Warm Water and Soap (For Water-Based Paints):
- Fill a sink or bucket with warm water and add a few drops of mild dish soap. Place the roller tray in the water and use a brush or sponge to scrub away any remaining paint. Rinse thoroughly with clean water.
- Use Solvent (For Oil-Based Paints):
- If you've been using oil-based paints, use a suitable solvent or paint thinner to clean the roller tray. Follow the manufacturer's instructions for the specific solvent you're using. Be sure to work in a well-ventilated area and wear appropriate safety gear.
- Check for Lingering Paint:
- Inspect the tray for any remaining traces of paint. If needed, repeat the cleaning process until the tray is completely free of paint.
- Dry Thoroughly:
- Once clean, allow the roller tray to air dry or use a clean cloth to wipe it down. Ensure that no moisture is left before storing it.
Maintenance:
- Inspect for Damage:
- Regularly check the roller tray for any signs of damage, such as cracks, warping, or weakened areas. If you notice any issues, it may be time to replace the tray.
- Store Properly:
- Store the roller tray in a dry, cool place to prevent warping or degradation. Avoid exposure to direct sunlight or extreme temperatures, which can weaken the material.
- Avoid Harsh Chemicals:
- When cleaning the tray, avoid using harsh chemicals or abrasive cleaning agents, as they can damage the tray's material.
- Avoid Overloading:
- Be mindful not to overload the tray with an excessive amount of paint. This can lead to drips, uneven application, and unnecessary mess.
- Use Compatible Paints:
- Ensure that you're using paints that are suitable for the type of roller tray you have. Some trays may be better suited for specific types of paint, such as water-based or oil-based.
- Replace When Necessary:
- If your roller tray becomes significantly worn, damaged, or no longer holds paint effectively, it's time to invest in a new one. Using a worn-out tray can lead to subpar results.


