
Mastering Dropped Ceilings
A dropped ceiling, also known as a suspended or false ceiling, is a secondary ceiling installed below the original structure. It serves various purposes, including enhancing acoustics, concealing infrastructure, and providing aesthetic appeal. Dropped ceilings come in a range of materials and styles, offering versatile design options for both residential and commercial spaces. Regular maintenance ensures they remain functional and visually appealing over time.
Choosing the Right Material for Your Dropped Ceiling
In the realm of interior design, one often overlooked yet indispensable element is the dropped ceiling. Also known as suspended or false ceilings, they have revolutionized the way we approach architectural spaces. From concealing unsightly utilities to enhancing acoustics, dropped ceilings have evolved into a versatile tool for designers and architects.
The Benefits of Dropped Ceilings
- Acoustic Enhancement:
One of the most significant advantages of dropped ceilings is their ability to improve acoustics within a space. By adding an extra layer of material beneath the main ceiling, sound waves are absorbed, reducing echoes and minimizing noise levels. This is particularly crucial in environments where clear communication or concentration is essential, such as offices, classrooms, conference rooms, and auditoriums.
- Concealing Infrastructure:
Dropped ceilings provide an elegant solution for concealing unsightly building systems, including electrical wiring, plumbing, HVAC ducts, and structural elements. This not only contributes to a cleaner and more polished aesthetic but also makes maintenance and repairs more accessible. Additionally, it allows for the integration of lighting fixtures, ventilation systems, and other elements seamlessly into the ceiling design.
- Aesthetic Flexibility:
Dropped ceilings offer a wide range of design possibilities. They serve as a blank canvas for creativity, allowing designers to incorporate various materials, colors, textures, and patterns. This versatility enables the customization of spaces to match specific aesthetics, whether it's a sleek modern look, a classic and elegant style, or a creative and artistic expression.
- Energy Efficiency:
In larger spaces, dropped ceilings can help improve energy efficiency. By reducing the volume of the room, they can aid in maintaining a consistent temperature and reducing heating or cooling costs. This is particularly relevant in commercial settings where climate control is crucial for comfort and productivity.
- Fire Safety and Code Compliance:
Many dropped ceiling materials are fire-resistant, which adds an extra layer of safety to a space. Additionally, dropped ceilings can help in meeting building code requirements, especially in spaces where fire-rated materials and systems are mandated.
- Versatility in Lighting Solutions:
Dropped ceilings provide a convenient platform for integrating various lighting options. Recessed lighting fixtures, track lighting, and even LED strips can be seamlessly incorporated into the ceiling design. This allows for precise control over illumination levels and helps set the desired ambiance within a space.
- Improved Air Quality:
Depending on the materials used, dropped ceilings can contribute to better indoor air quality. Some ceiling panels are designed to be resistant to mold, mildew, and other allergens, helping to create a healthier environment for occupants.
- Cost-Effective Renovation Option:
Dropped ceilings can be a cost-effective way to enhance the appearance and functionality of a space without the need for extensive structural changes. They are relatively quick to install compared to other renovation projects, making them a practical choice for both new construction and remodeling projects.
Types of Dropped Ceilings and Materials
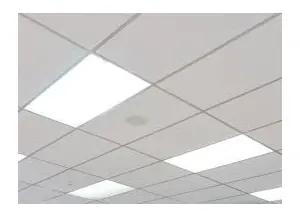
- Suspended Grid Ceilings:
Materials:
- Metal Grids: Typically made of aluminum, steel, or galvanized steel, these grids provide a sturdy framework for supporting ceiling tiles or panels.
- Ceiling Tiles: These tiles are commonly constructed from mineral fiber, fiberglass, or metal. They are available in a wide range of styles, textures, and finishes.
Applications:
- Commercial Spaces: Offices, retail stores, healthcare facilities.
- Educational Institutions: Classrooms, lecture halls.
- Institutional Buildings: Libraries, government buildings.
- Stretch Ceilings:
Materials:
- PVC Membranes: These are durable, lightweight, and available in a wide array of colors, textures, and finishes. They are stretched across a frame to create a seamless and continuous surface.
Applications:
- Residential Spaces: Living rooms, bedrooms, kitchens.
- Commercial Spaces: Restaurants, hotels, lobbies.
- Wooden Ceilings:
Materials:
- Natural Wood Panels: These are typically made from hardwoods like oak, maple, or cherry. They provide a warm and inviting aesthetic.
Applications:
- Residential Spaces: Cabins, cottages, rustic-themed interiors.
- Commercial Spaces: Upscale restaurants, boutique hotels, country clubs.
- Metal Ceilings:
Materials:
- Aluminum or Steel Panels: These panels offer a sleek and modern appearance. They can be finished with various coatings for different looks.
Applications:
- Commercial Spaces: Airports, train stations, modern office buildings.
- Industrial Spaces: Warehouses, manufacturing facilities.
- Gypsum Ceilings:
Materials:
- Gypsum Board: This is a common material used for creating intricate and decorative ceiling designs. It is easy to work with and can be molded into various shapes.
Applications:
- Residential Spaces: Living rooms, dining areas, hallways.
- Commercial Spaces: High-end restaurants, theaters, luxury boutiques.
- Fiberglass Ceilings:
Materials:
- Fiberglass Panels: These are lightweight, durable, and resistant to moisture, making them suitable for humid environments.
Applications:
- Institutional Spaces: Swimming pools, gyms, spas.
- Commercial Spaces: Bathrooms, kitchens, clean rooms.
- Plaster Ceilings:
Materials:
- Plaster: Traditional plaster is applied in layers to create intricate and ornate designs. It can be molded into a wide range of shapes and patterns.
Applications:
- Historical or Architecturally Significant Buildings: Museums, heritage sites, restored estates.

The Installation Process
1. Initial Assessment and Planning:
- Measurements and Layout: Accurate measurements of the room's dimensions are crucial. Determine the placement of lights, vents, and any other fixtures that will be integrated into the ceiling.
- Material Selection: Choose the appropriate type of ceiling tiles or panels, considering factors such as acoustics, aesthetics, and fire resistance.
2. Preparation of the Workspace:
- Clear the Area: Remove any furniture or fixtures from the room to provide clear access to the ceiling.
- Protect Floors and Surfaces: Cover the floor and any valuable items in the room with drop cloths or plastic sheets to prevent damage from dust or debris.
3. Installation of the Grid Framework:
- Locate Ceiling Joists: Using a stud finder, locate and mark the positions of the ceiling joists. This is where the main support points for the grid will be located.
- Install Suspension Wires: Attach wires to the ceiling joists at regular intervals. These wires will support the main T-bars of the grid.
- Install Main T-Bars: Secure the main T-bars to the suspension wires, creating a level grid framework. Ensure that they are aligned correctly.
- Insert Cross T-Bars: Connect the cross T-bars to the main T-bars, forming a grid pattern. These will provide additional support for the ceiling tiles or panels.
4. Install Ceiling Tiles or Panels:
- Cut Tiles to Size: If necessary, trim the tiles or panels to fit along the perimeter of the room or around fixtures.
- Insert Tiles into the Grid: Gently lift the tiles or panels and slide them into the grid openings. They should fit snugly but not be forced.
- Ensure Alignment: Check that the tiles are aligned properly and sit flush within the grid framework.
5. Integrate Fixtures and Accessories:
- Install Lighting Fixtures: If there are recessed lights or other fixtures to be integrated, follow manufacturer instructions for installation within the dropped ceiling.
- Attach Air Vents and Grilles: Secure ventilation components in place, making sure they are properly aligned and functional.
6. Finishing Touches:
- Seal Joints and Gaps: Use appropriate sealants or tapes to cover any gaps between tiles or panels. This helps to create a seamless appearance.
- Paint or Finish as Desired: Apply paint or other finishing materials to the ceiling tiles or panels, if desired.
7. Clean-Up and Final Inspection:
- Remove Protective Coverings: Take care to remove any protective coverings from the floor and surfaces.
- Inspect the Installation: Check for any visible flaws, misalignments, or areas that require adjustment.
8. Final Considerations:
- Accessibility and Maintenance: Ensure that access points are established for future maintenance, repairs, or alterations.
- Compliance with Regulations: Verify that the installation meets local building codes and regulations.
- Dispose of Waste: Properly dispose of any leftover materials, packaging, and debris from the installation process.
Design Possibilities
- Dynamic Lighting Effects:
- Incorporate LED strips or recessed lights along the perimeter of the ceiling to create a soft, ambient glow.
- Install track lighting or pendant fixtures at various heights to add depth and visual interest.
- Use color-changing LED lights to set different moods or highlight specific areas.
- Texture and Pattern Play:
- opt for textured tiles or panels to add depth and dimension to the ceiling surface.
- Experiment with geometric patterns, waves, or 3D designs for a modern and artistic touch.
- Mix and match different tile shapes, sizes, and colors for a unique and eclectic look.
- Natural Elements:
- Integrate wooden panels or beams for a warm and inviting atmosphere, especially in rustic or organic-themed spaces.
- Use natural materials like bamboo or cork for an eco-friendly and sustainable design.
- Metallic Finishes:
- Choose metallic or mirrored tiles to create a sleek and glamorous aesthetic, perfect for contemporary or high-end spaces.
- Incorporate copper or brass accents for a touch of opulence and sophistication.
- Incorporate Art and Graphics:
- Apply custom graphics, murals, or artwork directly onto the ceiling for a personalized and visually striking statement.
- Use stencils or decals to add intricate patterns or designs that complement the overall theme of the space.
- Multifunctional Ceilings:
- Integrate hidden storage compartments or built-in shelving within the dropped ceiling for a space-saving and practical solution.
- Install retractable screens or projectors for multimedia presentations in conference rooms or home theaters.
- Acoustic Innovation:
- opt for specialized acoustic tiles or panels designed to enhance sound quality while maintaining a sleek and stylish appearance.
- Incorporate strategic perforations or cutouts in the ceiling to improve acoustics without compromising aesthetics.
- Nature-Inspired Themes:
- Create a serene and calming atmosphere by incorporating elements like cloud-shaped panels or a sky-inspired color palette.
- Install hanging gardens or greenery to bring the beauty of nature indoors.
- Illusion of Height:
- Paint the ceiling a lighter color than the walls to create the illusion of higher ceilings and a more open, spacious feel.
- Use vertical lines or patterns to draw the eye upward, giving the impression of increased height.
- Interactive Elements:
- Install interactive panels or screens that respond to touch or motion, adding an engaging and dynamic element to the space.
- Incorporate sound or motion sensors that trigger specific lighting effects or patterns in response to movement.
maintenance
- Regular Cleaning:
- Dust Removal: Use a soft brush or a vacuum cleaner with a brush attachment to remove dust and debris from the surface of the ceiling tiles or panels. This should be done on a monthly or quarterly basis, depending on the level of dust accumulation.
- Spot Cleaning: For stains or marks on the ceiling, use a mild detergent or cleaning solution with a soft cloth or sponge. Avoid abrasive cleaners or scrubbing too vigorously to prevent damage to the surface.
- Inspection and Repairs:
- Check for Water Damage: Periodically inspect the ceiling for any signs of water leaks or moisture damage. If you notice discoloration, sagging, or water stains, identify and address the source of the leak promptly to prevent further damage.
- Replace Damaged Tiles or Panels: If any tiles or panels are cracked, broken, or discolored beyond repair, replace them as soon as possible to maintain a uniform and visually appealing appearance.
- Address Sagging or Warping: If the ceiling shows signs of sagging or warping, it may be indicative of structural issues. Consult a professional to assess and rectify the problem.
- Maintaining Fixtures and Accessories:
- Inspect Lighting Fixtures: Regularly check bulbs, tubes, and fixtures to ensure they are functioning properly. Replace any burnt-out bulbs or malfunctioning fixtures promptly.
- Clean Air Vents and Grilles: If the dropped ceiling includes ventilation components, clean or replace filters as needed to maintain proper air circulation.
- Preventative Measures:
- Control Humidity: Ensure that the room is adequately ventilated to prevent excess moisture, which can lead to mold growth or deterioration of ceiling materials.
- Avoid Harsh Chemicals: When cleaning the ceiling, use mild, non-abrasive cleaning solutions to avoid damaging the surface.
- Protect from Potential Hazards: If the space is prone to activities that may cause damage, consider implementing protective measures, such as covering the ceiling during construction work.
- Professional Inspections:
- Periodic Professional Assessment: Consider scheduling periodic inspections by a professional contractor or maintenance team to assess the overall condition of the dropped ceiling, identify any potential issues, and recommend necessary repairs or replacements.
Dropped ceilings are a versatile and dynamic design element that can truly elevate any space. From their historical origins in acoustic improvement to their modern applications in aesthetics and functionality, they have become an integral part of interior design. Whether it's concealing infrastructure, enhancing acoustics, or simply adding a touch of elegance, dropped ceilings offer a myriad of benefits that make them an indispensable tool for architects and designers alike. Embracing the potential of dropped ceilings is a step towards creating spaces that are not only visually captivating but also optimized for comfort and functionality.


