
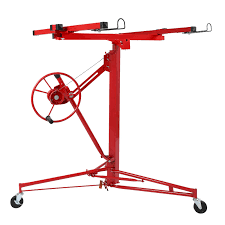
Elevate Your Construction Projects with a Drywall Lift
A drywall lift is a specialized construction tool designed to assist in the installation of drywall panels. It features a sturdy frame with an adjustable platform that can hold and elevate drywall sheets, making it easier to position them accurately on walls or ceilings. Drywall lifts are equipped with height and angle adjustments, allowing for precise placement of panels. They are widely used in construction and renovation projects to improve efficiency, safety, and the quality of drywall installations.
Essential Tips for Efficient Drywall Lift Operation

In the world of construction, efficiency and precision are paramount. Whether you're a seasoned contractor or a DIY enthusiast, the task of installing drywall can be physically demanding and time-consuming. This is where a drywall lift comes into play, revolutionizing the way we approach this essential aspect of construction.
A drywall lift, also known as a sheetrock lift or plasterboard hoist, is a versatile tool designed to simplify the process of lifting and positioning drywall sheets onto walls or ceilings. It not only minimizes the physical strain on workers but also ensures that panels are installed accurately and securely.
Types of Drywall Lifts
- Manual Drywall Lifts:
- Description: Manual drywall lifts are operated by hand without the need for any external power source. They rely on manual mechanisms, usually involving winches or cranks, to lift and position drywall panels.
- Advantages:
- Affordability: Manual lifts are typically more budget-friendly compared to their powered counterparts, making them a cost-effective choice for smaller projects or for those on a tight budget.
- Portability: They are generally lighter and more portable, making them easier to transport and maneuver around job sites.
- Ease of Maintenance: Manual lifts have fewer moving parts and are easier to maintain and repair.
- Considerations:
- Physical Exertion: While manual lifts are less physically demanding than lifting drywall by hand, they still require some physical effort to operate, especially for heavier panels.
- Powered Drywall Lifts:
- Description: Powered drywall lifts are equipped with an electric motor that automates the lifting process. They are designed to handle larger and heavier panels, making them suitable for more demanding projects.
- Advantages:
- Increased Efficiency: Powered lifts can significantly increase productivity by automating the lifting process, reducing the time and effort required to install panels.
- Handling Heavy Loads: They are capable of lifting and positioning heavier panels that may be too strenuous to handle manually.
- Adjustable Features: Many powered lifts come with additional features like adjustable height settings and swivel mechanisms, allowing for precise positioning of panels.
- Considerations:
- Power Source: Powered lifts require access to electricity, which may not always be available on all job sites.
- Cost: They are generally more expensive than manual lifts, which may be a factor for those on a tight budget.
- Fixed-Arm Drywall Lifts:
- Description: Fixed-arm drywall lifts have a set arm length, which means they have a specific reach and can only lift panels to a certain height.
- Advantages:
- Simplicity: They are straightforward to operate and are suitable for standard installations without the need for complex adjustments.
- Considerations:
- Limited Reach: The fixed arm length may restrict the lift's ability to reach higher ceilings or walls.
- Telescoping-Arm Drywall Lifts:
- Description: Telescoping-arm drywall lifts have adjustable arms that can extend or retract, allowing for a greater range of reach and height adjustment.
- Advantages:
- Versatility: They offer greater flexibility in terms of reach, making them suitable for a wider range of projects, including those with higher ceilings or walls.
- Considerations:
- Cost: Telescoping-arm lifts may be more expensive than fixed-arm models due to their added versatility and adjustability.
- Folding Drywall Lifts:
- Description: Folding drywall lifts are designed for easy storage and transportation. They have collapsible frames that can be folded down, making them more compact.
- Advantages:
- Portability: They are highly portable and can be easily transported in vehicles, making them ideal for contractors who need to move between job sites.
- Considerations:
- Assembly: Folding lifts may require additional assembly or disassembly time compared to non-folding models.
uses of Drywall Lift
Drywall lifts are versatile tools designed to simplify the process of lifting and positioning drywall panels. Their adaptability makes them invaluable for a variety of construction and renovation projects.
- Installing Drywall Panels:
- The primary and most common use of a drywall lift is for installing drywall panels on walls and ceilings. It allows for precise positioning, ensuring that panels are aligned correctly and securely fastened.
- Ceiling Installation:
- Installing drywall on ceilings can be particularly challenging due to the added difficulty of working overhead. A drywall lift makes this task much easier and safer, as it provides support and allows for accurate placement.
- Large or Heavy Panels:
- Drywall lifts are crucial when working with large or heavy panels that would be impractical or unsafe to handle manually. The lift's mechanisms provide the necessary leverage to lift and position these panels with ease.
- High Ceilings or Walls:
- For projects involving tall walls or high ceilings, a drywall lift is essential. It enables workers to position panels at elevated heights safely and accurately, reducing the risk of accidents or strain.
- Single-Person Operation:
- With a drywall lift, a single person can handle the installation of drywall panels. This increases efficiency and reduces the need for additional labor, making it a cost-effective solution.
- Precise Panel Positioning:
- Drywall lifts are equipped with adjustable features that allow for precise positioning of panels. This is crucial for achieving a professional finish and minimizing the need for adjustments or rework.
- Working in Confined Spaces:
- In tight or confined spaces, maneuvering large drywall panels can be challenging. A drywall lift provides the necessary support and control to navigate these spaces and accurately position the panels.
- Commercial Construction:
- Drywall lifts are commonly used in commercial construction projects where large quantities of drywall need to be installed efficiently. Their speed and precision significantly contribute to meeting project deadlines.
- Residential Renovations:
- In home renovation projects, especially those involving the addition of walls or ceilings, a drywall lift is an indispensable tool. It allows for professional-grade installations in residential settings.
- DIY Projects:
- DIY enthusiasts can benefit from using a drywall lift for home improvement projects. It empowers individuals to tackle drywall installations with confidence and achieve a high-quality result.
- Multi-Purpose Use:
- While primarily designed for drywall, these lifts can also be used for installing other materials like plywood, sheetrock, and certain types of panels or boards used in construction.
- Painting and Finishing:
- In addition to installation, drywall lifts can be used for painting and finishing tasks. By holding the panels steady, they provide a stable platform for applying paint or finishes.
Key Benefits of Using a Drywall Lift
- Enhanced Safety:
- Reduced Risk of Injuries: Using a drywall lift minimizes the need for manual lifting and positioning of heavy panels. This reduces the risk of strains, sprains, and other musculoskeletal injuries that can occur from lifting and holding heavy loads.
- Stability and Control: A drywall lift provides a stable platform for holding and maneuvering the panel. This stability ensures that the panel is positioned accurately without wobbling or slipping, reducing the likelihood of accidents.
- Increased Efficiency:
- Time-Saving: A drywall lift speeds up the installation process significantly. It allows for quick and precise placement of panels, reducing the time spent on this crucial aspect of construction.
- Consistent Installation: With a drywall lift, panels are consistently positioned and secured, resulting in a professional finish. This eliminates the need for adjustments or rework, further saving time and effort.
- Versatility:
- Handles Different Panel Types: Drywall lifts are designed to accommodate various types of panels, including standard drywall sheets, cement boards, and even plywood. This versatility makes them indispensable for a wide range of construction projects.
- Adapts to Different Surfaces: Whether you're working on walls or ceilings, a drywall lift can be adjusted to the required angle and height, ensuring precise installation in any scenario.
- Precise Positioning:
- Accurate Alignment: The adjustable features of a drywall lift allow for precise positioning of panels. This ensures that they are aligned perfectly on walls or ceilings, resulting in a seamless and professional-looking finish.
- Minimizes Adjustments: Panels lifted with a drywall lift are less likely to require adjustments after installation. This precision saves time and ensures a higher quality end result.
- Reduced Fatigue:
- Minimizes Physical Strain: Using a drywall lift significantly reduces the physical strain on workers. This helps maintain productivity levels throughout the day and reduces the risk of overexertion-related injuries.
- Increases Productivity: By reducing physical fatigue, workers can maintain a higher level of productivity over extended periods, ultimately leading to faster project completion.
- Improved Ergonomics:
- Comfortable Working Position: A drywall lift allows workers to adjust the height and angle of the panel to a comfortable working position. This reduces strain on the back, shoulders, and arms, promoting better ergonomics.
- Reduces Awkward Movements: The lift's maneuverability and adjustability enable workers to position panels without awkward or strenuous movements, further enhancing ergonomics and reducing the risk of injuries.
- Cost-Effectiveness:
- Long-Term Savings: While the initial investment in a drywall lift may seem significant, the time and labor savings it provides over the course of multiple projects can lead to substantial long-term cost savings.
- Minimizes Rework Costs: The precise positioning facilitated by a drywall lift reduces the likelihood of errors or damage during installation, minimizing the need for costly rework.
Operating a Drywall Lift
Operating a drywall lift is a straightforward process that, when done correctly, can greatly simplify the task of installing drywall panels.
- Setup and Assembly:
- Begin by selecting a flat and stable surface for setting up the drywall lift. Ensure that the surface is free of obstacles and debris.
- Assemble the drywall lift according to the manufacturer's instructions. This typically involves attaching the legs, stabilizing arms, and the lifting platform. Ensure that all components are securely in place.
- Double-check that all bolts, pins, and fasteners are tightened properly to guarantee the stability and safety of the lift.
- Loading the Panel:
- Place the drywall panel horizontally on the lift's platform. Position it so that it is centered and balanced to prevent any tilting or instability during elevation.
- Make sure the bottom edge of the panel is flush with the bottom of the lift's platform to ensure even weight distribution.
- Adjusting Height and Angle:
- Depending on the lift's design, use the height adjustment mechanism to raise the panel to the desired level. This is typically done by turning a crank or using a winch. Begin by lifting the panel slightly off the ground, then adjust to the desired height.
- Some models also allow for angling the panel, which is useful for ceiling installations. Adjust the angle as needed to match the slope of the ceiling.
- Transport and Position:
- Once the panel is securely on the lift and at the desired height, carefully maneuver the lift to the location where the panel will be installed. Use the lift's wheels (if equipped) to roll it into position.
- Guide the panel into place, ensuring that it aligns properly with the surface. Take your time to make any necessary adjustments before securing it in place.
- Securing the Panel:
- With the panel in the correct position, secure it using the appropriate fasteners or adhesives. Follow the recommended installation guidelines for the specific type of panel you're using.
- Make sure that the panel is securely fastened to prevent any movement or sagging over time.
- Removing the Lift:
- Once the panel is secured in place, carefully lower the lift's platform to the ground using the height adjustment mechanism. Ensure that the panel is fully supported by the wall or ceiling before releasing it from the lift.
- If needed, disassemble the lift and store it in a safe and accessible location for future use.
Key Considerations for Choosing a Drywall Lift
Choosing the right drywall lift is crucial for ensuring smooth and efficient installation. Several key considerations should be taken into account to select a lift that aligns with the specific requirements of your project.
- Weight Capacity:
- Determine the maximum weight capacity of the drywall lift. It should be able to comfortably handle the heaviest panels you anticipate working with. It's advisable to choose a lift with a weight capacity that provides a margin above the typical weight of your panels.
- Height Reach:
- Consider the maximum height the drywall lift can achieve. This is particularly important for projects involving tall ceilings or high walls. Ensure the lift's maximum height exceeds the measurements required for your specific project.
- Portability and Storage:
- Evaluate the portability of the drywall lift, especially if you anticipate moving it between job sites. Look for features like wheels or casters for easy maneuverability. Additionally, consider whether the lift can be disassembled or folded for convenient storage and transportation.
- Additional Features:
- Some drywall lifts come with extra features that can enhance their functionality. These may include:
- Swivel Mechanism: Allows for 360-degree rotation of the panel, enabling precise positioning.
- Extension Arms: Provides extra reach for handling larger panels or reaching higher ceilings.
- Adjustable Tilt Function: Allows for tilting the panel to accommodate sloped ceilings or walls.
- Assess whether these additional features align with your specific project requirements and if they justify any potential increase in cost.
- Some drywall lifts come with extra features that can enhance their functionality. These may include:
- Budget:
- Set a budget for your drywall lift purchase. Consider the balance between cost, features, and performance. While it's important to stay within budget, remember that investing in a high-quality lift can lead to significant time and labor savings in the long run.
- Stability and Durability:
- Ensure that the drywall lift is constructed from durable materials that can withstand the demands of your projects. Look for features like reinforced steel frames and sturdy components.
- Check for stability features such as wide base legs or stabilizing arms to prevent wobbling or tipping during operation.
- Ease of Operation:
- Consider how user-friendly the drywall lift is. Features like intuitive controls, easy height adjustment mechanisms, and clear instructions can make a significant difference in the ease of operation.
- Compatibility with Panel Sizes:
- Verify that the drywall lift can accommodate the sizes of panels you commonly work with. This includes both the width and length of the panels. Some lifts may have adjustable arms or extensions to handle different panel sizes.
- Safety Features:
- Ensure that the drywall lift includes safety features such as locking mechanisms to secure the panel in place, as well as safety catches to prevent accidental release during operation.
- Reviews and Recommendations:
- Read reviews and seek recommendations from other professionals or contractors who have experience with the specific model or brand of drywall lift you are considering. Their insights can provide valuable information about real-world performance.
How to lift drywall sheets
- Gather the Necessary Tools and Equipment:
- Before you begin, make sure you have all the required tools and equipment on hand. This may include a utility knife, T-square or straightedge, measuring tape, and safety gear such as gloves and safety glasses.
- Ensure Adequate Assistance:
- Drywall sheets are large and can be unwieldy to handle alone. It's highly recommended to have at least one other person to assist you in lifting and positioning the panels. This ensures safety and helps prevent any potential accidents or injuries.
- Position the Panel for Lifting:
- Place the drywall sheet flat on the ground with the finished side facing down. This is to protect the finished surface from damage during handling.
- Measure and Mark for Cutting (if necessary):
- If you need to cut the drywall sheet to fit a specific area, use a measuring tape and T-square to mark the dimensions you need. Score along the lines with a utility knife, then gently snap the sheet along the scored line.
- Position Yourself for Lifting:
- Stand facing the panel with your feet shoulder-width apart. Position yourself near one end of the panel, allowing you to get a good grip.
- Bend Your Knees and Use Your Legs:
- To lift the drywall sheet, bend your knees and keep your back straight. This engages the larger, stronger muscles in your legs rather than straining your back.
- Grip the Panel Securely:
- With both hands, firmly grip the edges or corners of the drywall sheet. Ensure that your fingers are positioned underneath the panel for support.
- Lift Using a Controlled Motion:
- Use your leg muscles to gradually lift the drywall sheet off the ground. Keep your movements steady and controlled to prevent any sudden jolts or shifts.
- Communicate with Your Assistant:
- If you have an assistant, coordinate with them to ensure both of you are lifting at the same time and at a similar pace. This helps maintain balance and control.
- Move Slowly and Carefully:
- While lifting, be mindful of your surroundings and any potential obstacles. Move slowly to avoid bumping into walls, corners, or other objects.
- Positioning the Drywall Sheet:
- Once the drywall sheet is off the ground, carefully maneuver it into position against the wall or ceiling. Take your time to ensure it is aligned correctly.
- Secure the Drywall Sheet:
- Use appropriate fasteners (such as screws or nails) to secure the drywall sheet in place. Follow the recommended spacing and placement guidelines for your specific project.
How to use a drywall lift
Using a drywall lift can greatly simplify the process of installing drywall panels, especially for ceilings or high walls.
- Safety Precautions:
- Before starting, ensure you are wearing appropriate safety gear, including gloves and safety glasses. If you're working at a height, consider using a safety harness or working with a partner for added stability.
- Set Up the Drywall Lift:
- Choose a flat, stable surface for setting up the drywall lift. Ensure it's clear of any obstacles that may impede movement.
- Assemble the drywall lift according to the manufacturer's instructions. This typically involves attaching the legs, stabilizing arms, and the lifting platform. Make sure all components are securely in place.
- Double-check that all bolts, pins, and fasteners are tightened properly to guarantee the stability and safety of the lift.
- Loading the Drywall Panel:
- Place the drywall panel horizontally on the lift's platform, with the finished side facing down. Position it so that it is centered and balanced to prevent any tilting or instability during elevation.
- Ensure the bottom edge of the panel is flush with the bottom of the lift's platform for even weight distribution.
- Adjusting Height and Angle:
- Depending on the lift's design, use the height adjustment mechanism (often a winch or crank) to raise the panel to the desired level. Start by lifting the panel slightly off the ground, then adjust to the desired height.
- Some models allow for angling the panel, which is useful for ceiling installations. Adjust the angle as needed to match the slope of the ceiling.
- Transporting and Positioning:
- Once the panel is securely on the lift and at the desired height, carefully maneuver the lift to the location where the panel will be installed. Use the lift's wheels (if equipped) to roll it into position.
- Guide the panel into place, ensuring that it aligns properly with the surface. Take your time to make any necessary adjustments before securing it in place.
- Securing the Drywall Panel:
- With the panel in the correct position, secure it using the appropriate fasteners or adhesives. Follow the recommended installation guidelines for the specific type of panel you're using.
- Make sure that the panel is securely fastened to prevent any movement or sagging over time.
- Lowering the Drywall Lift:
- Once the panel is secured in place, carefully lower the lift's platform to the ground using the height adjustment mechanism. Ensure that the panel is fully supported by the wall or ceiling before releasing it from the lift.
- Disassembly and Storage:
- If needed, disassemble the lift and store it in a safe and accessible location for future use. Ensure that all components are properly stored to prevent damage.
A drywall lift is an invaluable tool that streamlines the process of installing drywall, enhancing both the safety and efficiency of your construction projects. Whether you opt for a manual or powered model, the benefits of using a drywall lift are undeniable. By carefully considering factors like weight capacity, height reach, and additional features, you can choose the perfect lift for your specific needs. With this powerful tool at your disposal, you'll elevate not only drywall panels but also the overall quality and speed of your construction endeavors. So, gear up with a drywall lift and watch your projects soar to new heights of excellence.


